When tackling the task of installing push-pull throttle cables on your Harley Davidson, you might worry about the complexity of the process. Fear not, as with a methodical approach and attention to detail, you can successfully complete this task without unnecessary stress.
The satisfaction of properly installed throttle cables ensuring smooth operation and control of your Harley awaits, but before you get there, let's start with the essential steps to set you on the right path.
Key Takeaways
- Disconnect, remove, and install throttle cables with care and attention to routing.
- Secure new cables properly under the tank to avoid tangling or misalignment.
- Adjust cable tension for smooth throttle operation and lock in the desired setting.
- Test throttle responsiveness, ensure smooth return to idle, and address any issues promptly.
Tools Required for Installation
You'll need a set of basic hand tools, including wrenches and screwdrivers, to successfully install the Harley Davidson push-pull throttle cables. When working on your bike, having the right tools is essential for a smooth installation process. Additionally, specific tools required may vary depending on the make and model of your Harley Davidson motorcycle.
For cable maintenance tips, it's advisable to regularly inspect the throttle cables for any signs of wear or fraying. Keeping the cables clean and well-lubricated can prolong their lifespan and ensure optimal performance. Using a cable lubricant specifically designed for motorcycles can help maintain the smooth operation of the new throttle cables.
If you're looking to customize your bike, you might consider installing custom throttle grips during the cable replacement process. Custom throttle grips not only provide a unique look but can also enhance your riding experience. Before starting the installation, make sure you have all the necessary tools at hand and follow the manufacturer's instructions meticulously for a successful outcome.
Removing the Old Throttle Cables
To proceed with removing the old throttle cables from your Harley Davidson, start by disconnecting them from the throttle wheel on the handlebars. Begin by loosening the pinch bolts that secure the master cylinder and brake lever in place. This will allow you to access the cables easily.
Roll back the rubber shielding to expose the cable adjusters, which need to be loosened to detach the cables completely. Once the adjusters are free, carefully disconnect the cables from their connection points on the motorcycle. Take care to keep track of how the cables are routed to aid in the installation of the new ones.
This step is crucial for proper cable maintenance and ensures a smooth transition to the installation of new push-pull throttle cables on your Harley Davidson. By following these disconnecting procedures diligently, you pave the way for a successful cable upgrade.
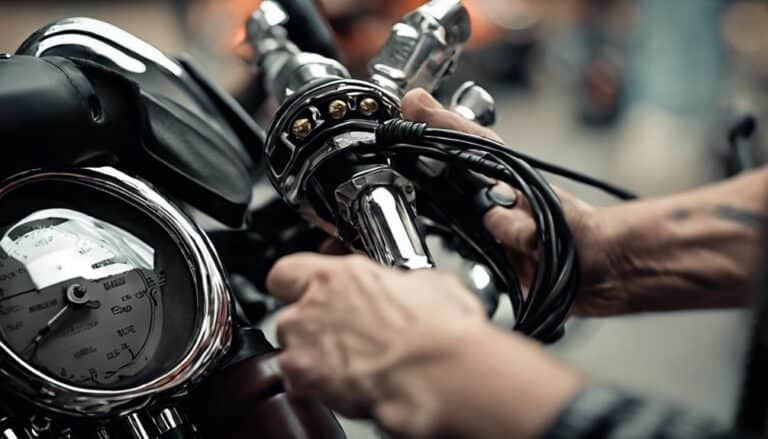
Installing the New Throttle Cables
Securing the new throttle cables under the tank using zip ties is a crucial step in the installation process. Begin by loosely zip-tying the new throttle cables together for easier handling during installation. Next, reattach the throttle grip ensuring proper alignment of the hand controls. Once the throttle grip is in place, secure the cables under the tank using zip ties to prevent any movement. Proceed to attach the throttle cables to the throttle wheel, making sure to adjust the idle cable and lock the jam nut against the adjuster for proper tension.
When installing, be mindful of the cable routing to avoid any kinks or interference that could affect throttle operation. Ensure that the cables aren't twisted or tangled, as this can lead to issues with throttle response. If you encounter any difficulties during installation, double-check the alignment of the hand controls and the throttle wheel to troubleshoot any potential problems. Following these installation techniques will help guarantee a smooth and efficient setup of the new throttle cables.
Adjusting the Throttle Cable Tension
Adjust the throttle cable tension by carefully turning the adjuster on the throttle cable housing.
Here are some essential steps to ensure your throttle operates smoothly:
- Loosen the lock nut: Before adjusting the tension, make sure to loosen the lock nut on the adjuster to allow for proper adjustment without resistance.
- Adjust the tension: Turn the adjuster either clockwise to increase tension or counterclockwise to decrease it. Fine-tune the tension until the throttle responds seamlessly to your twists.
- Lock the adjuster: Once you've achieved the desired tension for smooth operation, tighten the lock nut back in place to secure the adjustment.
Testing the Throttle Operation
Test the throttle operation by starting the motorcycle and twisting the grip back and forth to ensure smooth responsiveness. Make sure that the throttle returns smoothly to the idle position when released. Check for any binding or sticking in the throttle operation, as this could indicate issues with the throttle cable maintenance. Proper throttle cable lubrication techniques are essential to ensure a smooth throttle response. Verify that the throttle cables are properly adjusted and that the throttle response is consistent and without delays. If there are any irregularities in the throttle operation, it may require troubleshooting to identify and rectify the problem before riding the motorcycle. Ensure that the throttle cables are well maintained to prevent issues during operation. Proper maintenance and lubrication of the throttle cables can significantly improve the overall performance of the throttle system.
| Throttle Operation Test Checklist | ||
|---|---|---|
| Start motorcycle | Twist throttle back and forth | Check for smooth responsiveness |
| Ensure throttle returns to idle position | Verify proper cable adjustment | Address any binding or sticking issues |
Conclusion
Congratulations on successfully installing push-pull throttle cables on your Harley Davidson!
With precision and attention to detail, you have ensured smooth throttle operation for your ride.
Just like a well-oiled machine, your bike is now ready to rev up and hit the road with ease.
Keep the rubber side down and enjoy the ride!